Preprocessing
After Ingesting is complete, preprocess performs quality control, filtering, normalization, and preparation for dimensionality reduction.
Because spatial transcriptomics data are affected by technical noise and dropout, preprocessing is usually required to remove low-quality genes and spots or cells, followed by normalization steps such as library-size normalization and log transformation. At this stage, you can also select highly variable genes to reduce noise, and in multi-sample settings you can correct batch effects to improve the reliability of downstream analysis.
Workflow overview
Compute QC metrics and filter genes and spots or cells according to the selected thresholds.
Apply total-count normalization and log transformation.
Perform highly variable gene selection if enabled.
Run scaling and PCA, and optionally apply batch correction in multi-sample analyses.
Export the filtered object and save QC figures generated during preprocessing.
In short, this step prepares the spot-by-gene expression matrix for downstream analysis by improving data quality, standardizing values, and reducing technical noise.
Step 1: Configure sample.txt
You can directly reuse the same sample.txt configuration file from the integrate step; no modifications are needed.
sample_id input_path
sample_id data/sample_id
Step 2: Parameter Selection and Configuration
This step includes several important parameters. Please adjust them according to your needs. Below are some key parameters and their functions:
Parameter |
Example |
Description |
|---|---|---|
|
|
Control gene and spot/cell filtering thresholds |
|
|
Mitochondrial proportion threshold for filtering |
|
|
Batch correction method for integrated multi-sample analysis |
|
|
Number of highly variable genes |
|
|
Number of PCA components |
|
|
Whether to run highly variable gene selection |
|
|
Neighbor graph parameter |
|
|
Sampling settings for very large datasets |
Configuration recommendations:
For all scenarios: We recommend adjusting
min_cells,min_genes, andmt_thresholdbased on the violin plots generated duringintegrate. Depending on your analysis goals, choose values between 0 and 200 for gene- and cell-level thresholds, and between 30 and 50 formt_threshold. If you do not explicitly set these parameters, the default values will be used automatically.For multi-sample integrated data: In addition to tuning the above parameters, we recommend selecting an appropriate
batch_methodto correct for batch effects. Harmony is a commonly used method; alternatives such as BBKNN may also be considered.For datasets with hundreds of thousands or even millions of cells/spots: To improve processing efficiency and reduce memory usage, we recommend setting
--sketchtoTrueand choosing a suitable--sample_rate. Spatialsnake will internally use GeoSketch for sketch-based downsampled analysis. In subsequent steps, we recommend continuing to use--sketchin the clustering step to maintain a consistent downsampling strategy and project the clustering labels onto all spots/cells.
4. In multi-sample integration, different samples may require different thresholds such as min_cells, min_genes, or mt_threshold.
You can add these sample-specific settings directly to sample.txt, and the workflow will read them automatically and apply the corresponding filtering strategy.
Please also set --filter_list to True.
sample.txt can be modified as follows:
sample    input_path         group  min_cells min_genes mt_threshold
Colon_Cancer_P2   data/Colon_Cancer_P2   Tumor  50  50  30
Colon_Normal_P5  data/Colon_Normal_P5 Normal  50  50  30
Parameter configuration methods:
1. The parameters listed above are commonly used settings that can be passed directly on the command line.
If you are comfortable tuning spatial transcriptomics workflows, you can append them to the command as needed, for example --min_cells 5.
Optional parameters through a configuration file. As introduced in the Usage tutorial, you can customize all parameters by editing a YAML configuration file before running the module. Use the command below to generate the YAML file for this step, then modify it as needed.
spatialsnake produce-file --option=preprocess
Step 3: Run the Command
Based on the command-line introductions in previous tutorials, you should now be familiar with the logic for setting key parameters in Spatialsnake. Here we only demonstrate running the preprocess command. If you are working with multi-sample integration data or another platform, simply modify the relevant parameters accordingly.
For the example dataset, we use --min_cells 100 --min_genes 100 --mt_threshold 30 for single_analysis or visium_HD. This filters out spots or cells with fewer than 100 UMIs, fewer than 100 detected genes, or more than 30% mitochondrial signal.
spatialsnake single_analysis sample.txt visium_HD --option=preprocess --min_cells=100 --min_genes=100 --mt_threshold=30
Run with a YAML file. Remember to save the edited YAML file before execution. No additional command-line arguments are required; if you do provide them, they will override the YAML values.
spatialsnake single_analysis sample.txt visium_HD --option=preprocess --configfile=preprocess.yaml
Demo for preprocess with visium_HD
We use the Colon_Cancer_P2_008um data ingested in the previous step for this preprocessing demonstration.
The same sample.txt can be reused from the earlier analysis steps to maintain a consistent core analysis on the same sample.
sample_id input_path bin
Colon_Cancer_P2 data/Colon_Cancer_P2 8
Run the command
Based on the explanations above and the violin plot outputs from the integrate step, for a single-sample dataset we choose --min_cells 100 --min_genes 100 --mt_threshold 30 as the preprocessing parameters.
spatialsnake single_analysis sample.txt visium_HD --option=preprocess --min_cells=100 --min_genes=100 --mt_threshold=30
If you prefer YAML-based configuration for more detailed parameter control:
# Generate and edit the YAML file
spatialsnake produce-file --option=preprocess
spatialsnake single_analysis sample.txt visium_HD --option=preprocess --configfile=preprocess.yaml
Result file structure
This example shows single-sample preprocessing for visium_HD. After the run completes, first confirm that filter_{sample}.zarr has been generated, then review the QC figures to determine whether the chosen thresholds are appropriate.
results/
└── Colon_Cancer_P2_008um/
    └── preprocess/
        ├── filter_Colon_Cancer_P2.zarr # filtered zarr object
        ├── Colon_Cancer_P2filtered_Total_UMI.png # filtered UMI distribution
        ├── Colon_Cancer_P2filtered_Total_Genes.png # filtered gene-count distribution
        ├── Colon_Cancer_P2_Mitochondrial_Genes.png # mitochondrial signal distribution
        ├── Colon_Cancer_P2_scatter.png # scatter plot of filtered UMI versus gene counts
        ├── Colon_Cancer_P2pca_variance_ratio.png # PCA variance ratio plot
        └── Colon_Cancer_P2_highly_variable.png # highly variable gene selection plot
The file filter_{sample}.zarr is the core input for downstream clustering and annotation. The remaining figures are used to evaluate UMI distribution, gene complexity, mitochondrial proportion, outliers, and PCA variance explained. If highly variable gene selection or sketch-based sampling is disabled, the corresponding files will not be generated.
Key outputs
{sample}filtered_Total_UMI.png(total UMI distribution)

Filtered UMI distribution. Low-quality cells have been removed.
{sample}filtered_Total_Genes.png(detected gene distribution)

Distribution of detected genes after filtering.
{sample}pca_variance_ratio.pngand the recommended number of PCs printed in the terminalThis plot helps determine how many dimensions should be retained for downstream analysis.
The point where the curve clearly flattens often provides a useful reference.
In practice, compare a few nearby values around the recommended point and choose the most stable setting.
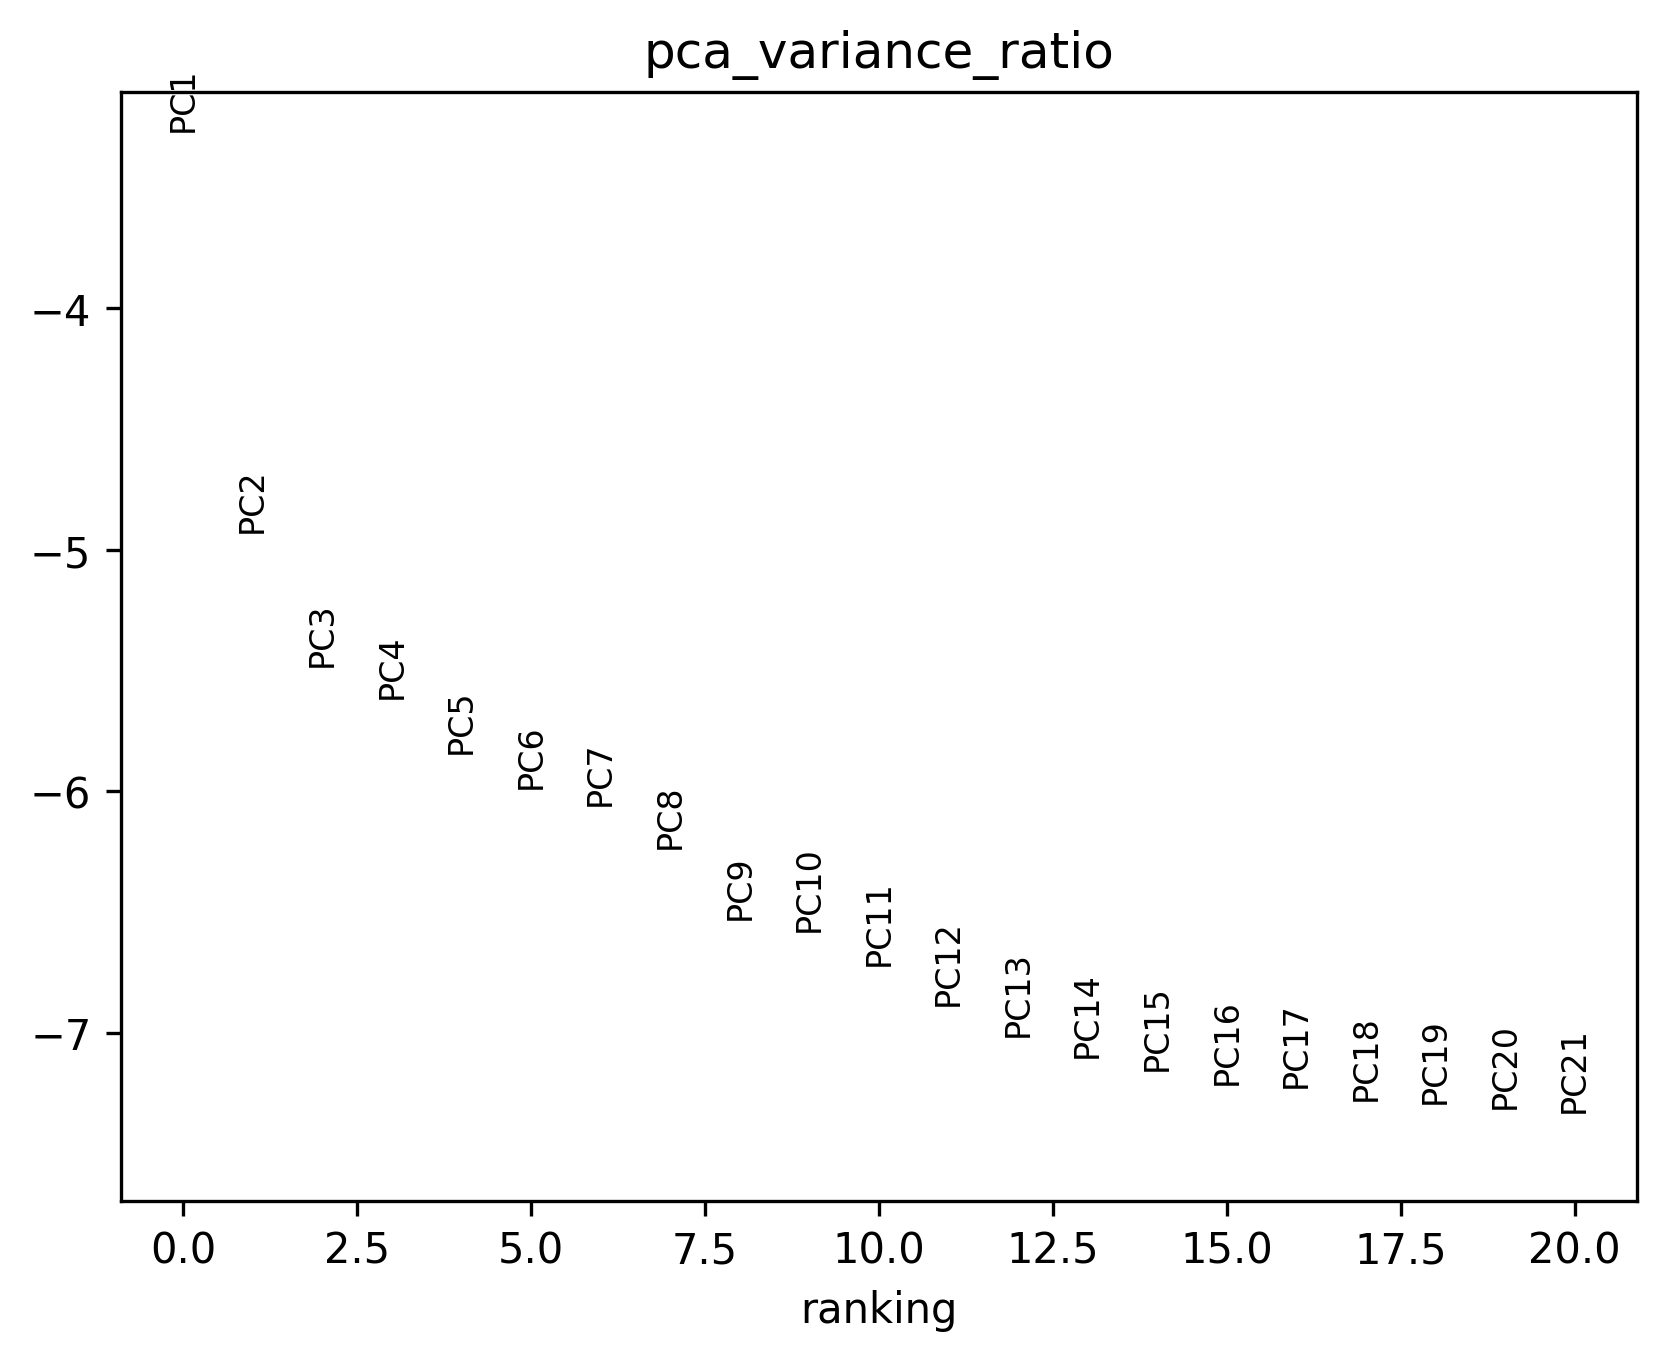
PCA variance ratio plot. Use this figure together with the recommended PC value shown in the terminal to choose a suitable pcs setting for clustering.
{sample}_Mitochondrial_Genes.png(mitochondrial signal distribution)This plot shows whether mitochondrial-related signal remains elevated after filtering.
If some regions are still globally high, consider tightening the filtering strategy while preserving sufficient data.
Adjust thresholds gradually to avoid removing genuine biological signal.
{sample}_scatter.png(summary scatter plot)This plot helps identify potential low-quality clusters of observations.
Pay particular attention to regions with low gene counts and high mitochondrial proportion.
Interpret it together with the previous plots for a more reliable conclusion.
{sample}_highly_variable.png(highly variable gene plot, optional)This plot confirms that downstream clustering will focus on the most informative genes.
If the selection is too narrow, structural information may be lost; if it is too broad, additional noise may be introduced.
Start with the default setting and refine it only if clustering results suggest it is necessary.
Continue to Clustering.